
Focaccia
A beautifully bubbly, light and airy focaccia with a crisp exterior. Best of all, no sourdough starter required! Just a little bit of time, and an appetite to enjoy once it’s baked. I’m confident that this will be the best ever focaccia you’ll make!
I don’t F with sourdough.
Of course I have considered it. Lusted over beautiful bubbles and incredible crumb shots that I keep seeing on IG. Dreamt of sourdough bread perfection, of having a go at making a starter and keeping it fed and alive (this part alone freaks me out).
But in reality, I am not a baker – nowhere near one – and as much as I love creating by hand and from scratch, the maintenance, variability and precision of bread baking is just not for me.
However that doesn’t mean that I’m not interested in being able to make bread. I just want it to be easy. And I also really want a good focaccia recipe that doesn’t immediately put me off because it says “sourdough starter” in the ingredients list. Is that too much to ask?
I don’t think so. Which is why over the past several months I have been on a quest to develop a consistent and straight forward focaccia recipe that yields beautiful air bubbles, a fine crunch, and of course one that doesn’t require a starter. And… I finally feel like I’ve succeeded.
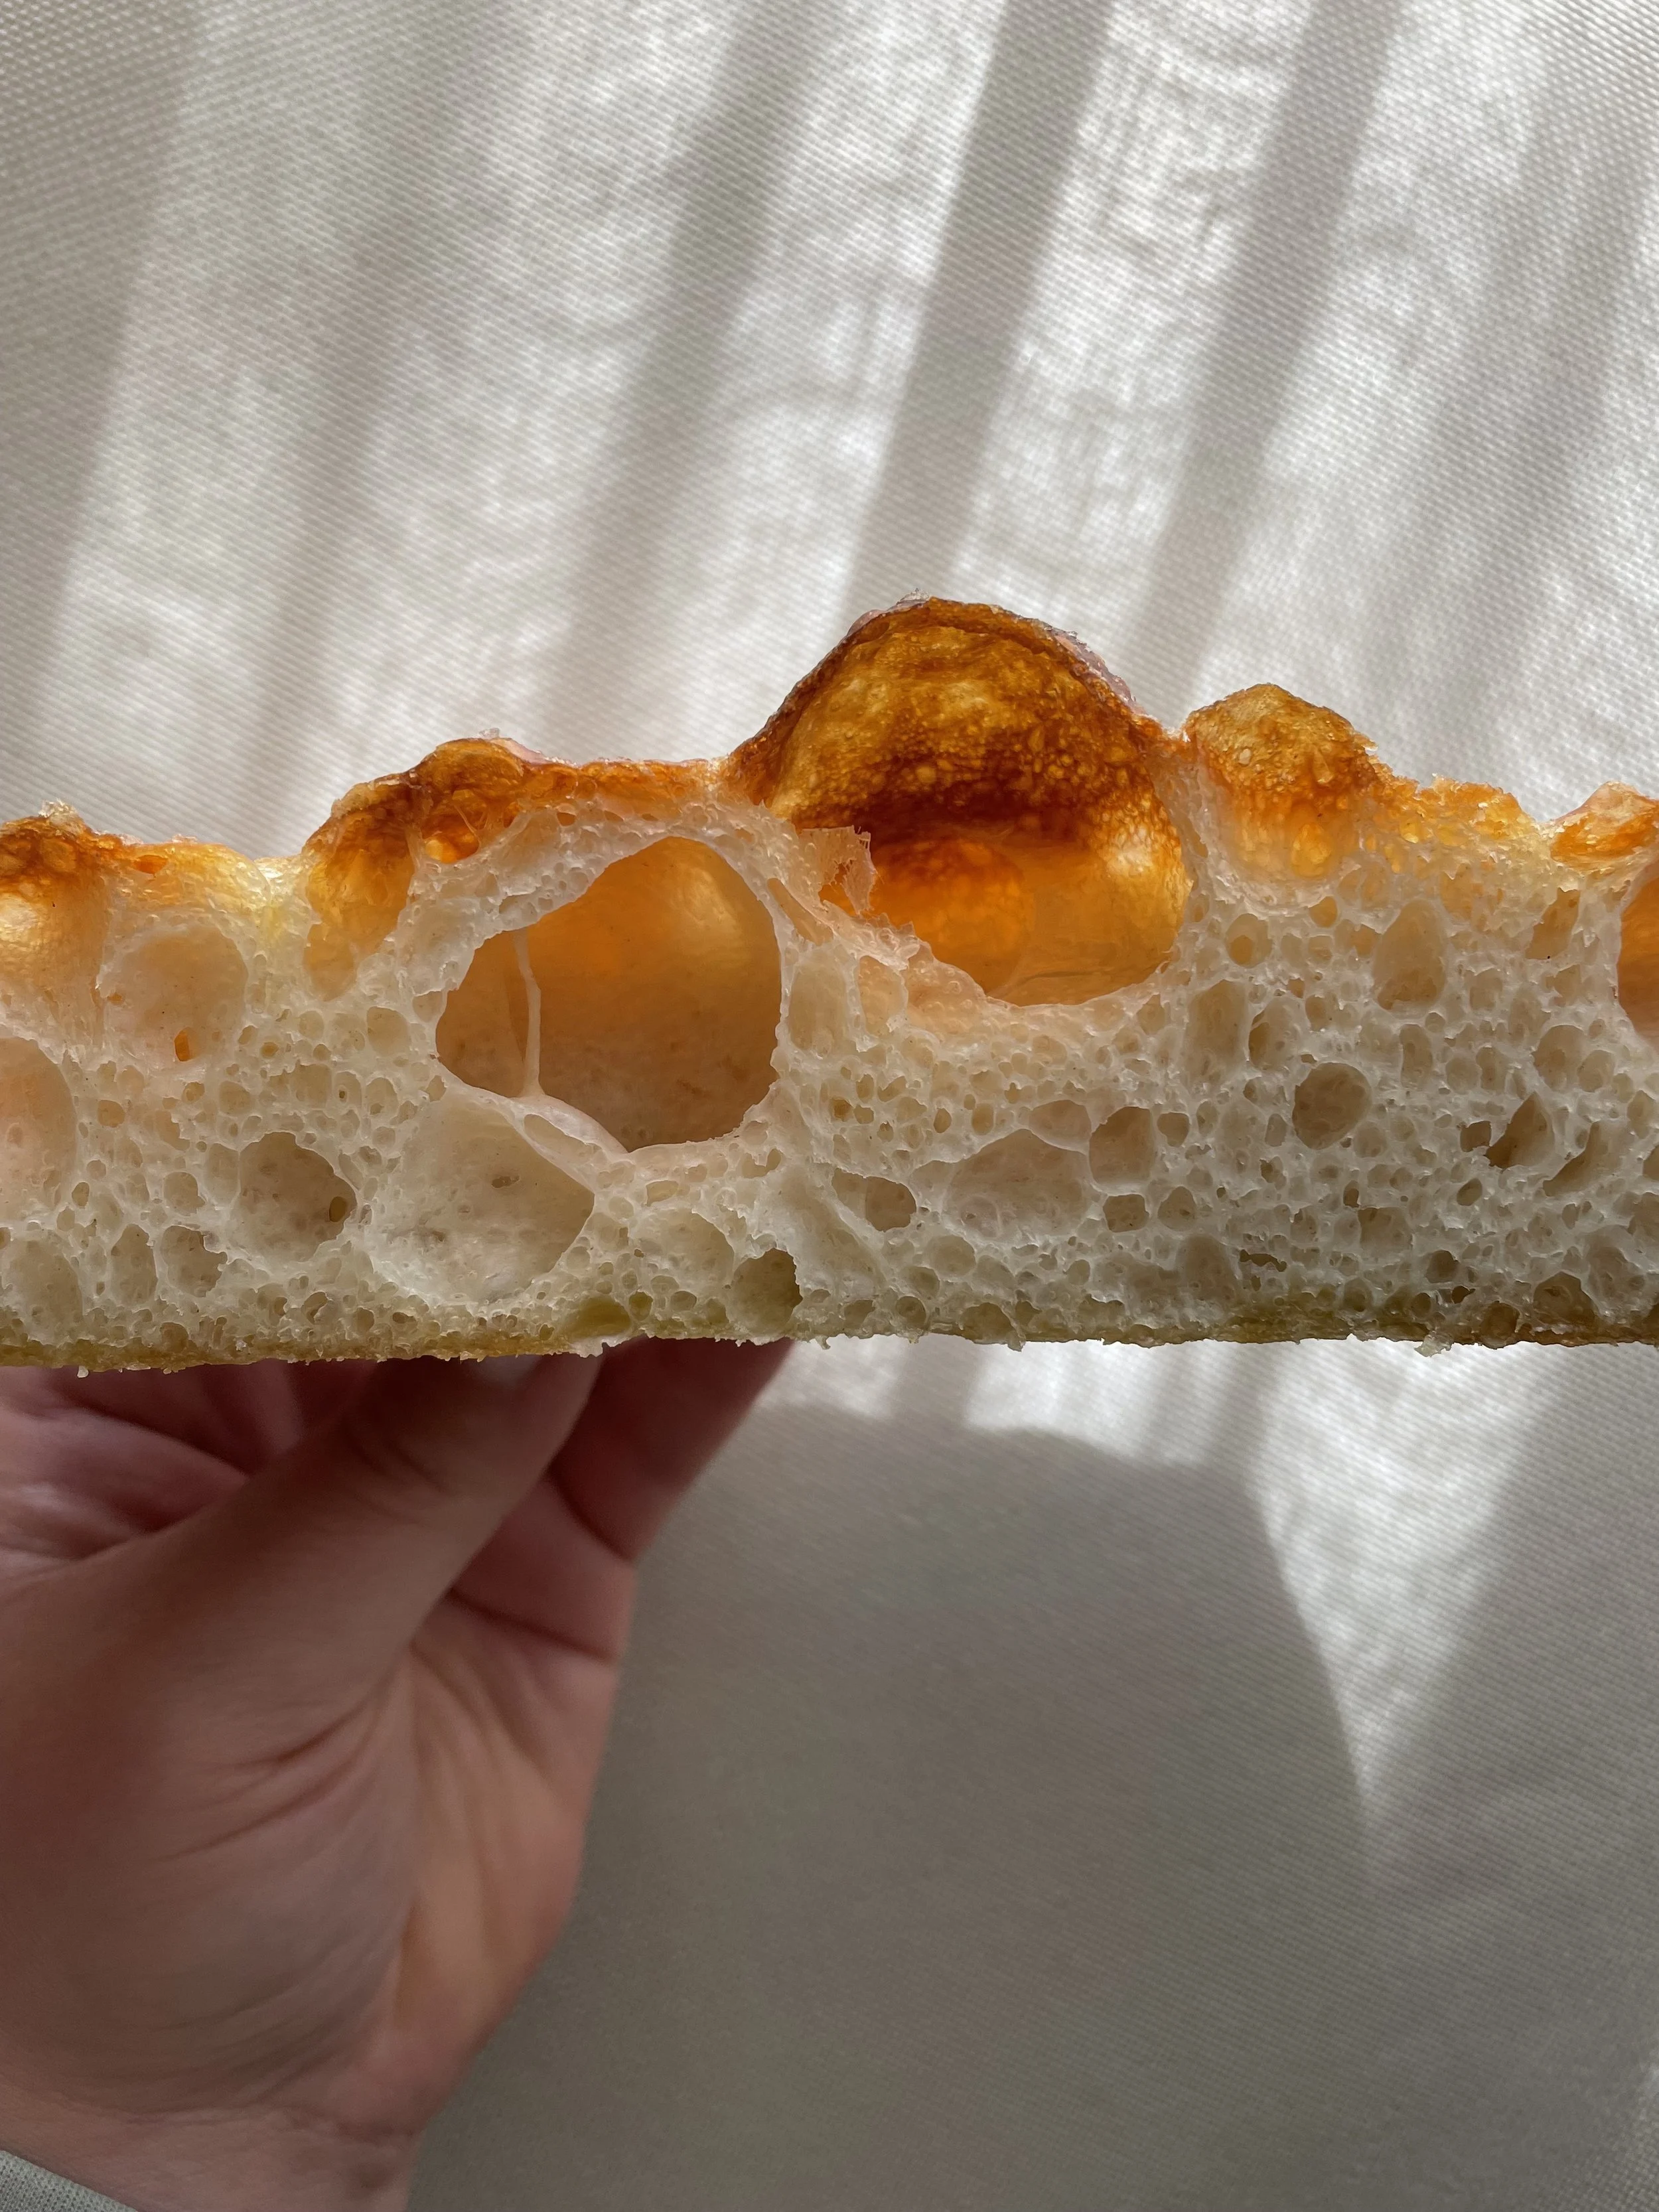
This focaccia is light, spongey and fluffy on the inside with a thin and crispy exterior. Bubbled throughout, but not overly so. Perfect for eating as is, or slicing in half for fancy sandwiches. Wonderful simply sprinkled with salt, or topped with whatever you like. Easy to inhale and as such: here for a good time, not a long time.
Why you’ll love this easy focaccia recipe
-
No sourdough starter required – enjoy incredible bread with beautiful air bubbles and a fantastic crumb, using simple instant dry yeast instead of a starter.
-
Fluffy inside, crispy outside – hits the perfect textural balance with a light, spongy centre and a thin, golden, olive-oil-fried crunch on the bottom.
-
Low-maintenance stretch and folds – no complicated kneading or baking expertise needed; a simple, hands-off folding technique builds all the structure for you.
-
The ultimate sandwich bread – because it’s baked to a perfect, manageable depth, it slices beautifully in half to elevate any lunch or picnic spread.
Ingredients you’ll need to make this dish
-
Strong bread flour – look for a high-protein flour between 12-14% (I highly recommend Mulino Caputo Manitoba Oro at 14%). This protein strength is vital to support the high water content and trap those gorgeous bubbles.
-
Water – split between the main autolyse dough and a smaller lukewarm amount to wake up your yeast.
-
Instant dry yeast – provides a reliable, high-quality rise without the hassle of a starter.
-
Honey – just a small spoonful to help activate the yeast and add a very subtle, rounded flavour note.
-
Extra virgin olive oil – and plenty of it! It coats the dough, flavours the crust, fries the bottom of the bread in the pan, and pools beautifully in the top dimples. More is more here.
-
Sea salt flakes – finer grounds go directly into the dough for flavour, whilst big, crunchy flakes are scattered on top before baking.
How to make this perfect no-starter focaccia
1. The autolyse rest
Gently mix your bread flour and the main portion of water together until just combined. Cover the bowl and let it rest for one hour. This hands-off step allows the flour to fully hydrate and kickstarts the gluten structure.
2. Wake up the yeast
A quarter of an hour before your dough finishes resting, whisk the instant dry yeast, honey, and lukewarm water together in a small bowl. Let it sit for 10-15 minutes until it becomes beautifully foamy on top.
3. Mix and knead
Combine your hydrated dough and foamy yeast mixture. You can use a stand mixer with a dough hook on a low speed, adding the salt and then the olive oil until a smooth dough forms. Alternatively, do it by hand in the bowl using a firm squeezing and cutting motion for about 10-15 minutes until the oil is completely incorporated.
4. Stretch and fold
Transfer the dough to an oiled container. It’s a wet, 90% hydration dough, so it will feel quite sticky! Cover it up and let it rest for 45 minutes. With wet hands, scoop under one side of the dough, stretch it upwards, and fold it over the centre. Turn the bowl and repeat on all four sides. Rest for another 45 minutes and repeat the process one more time.
5. Bulk ferment and shape
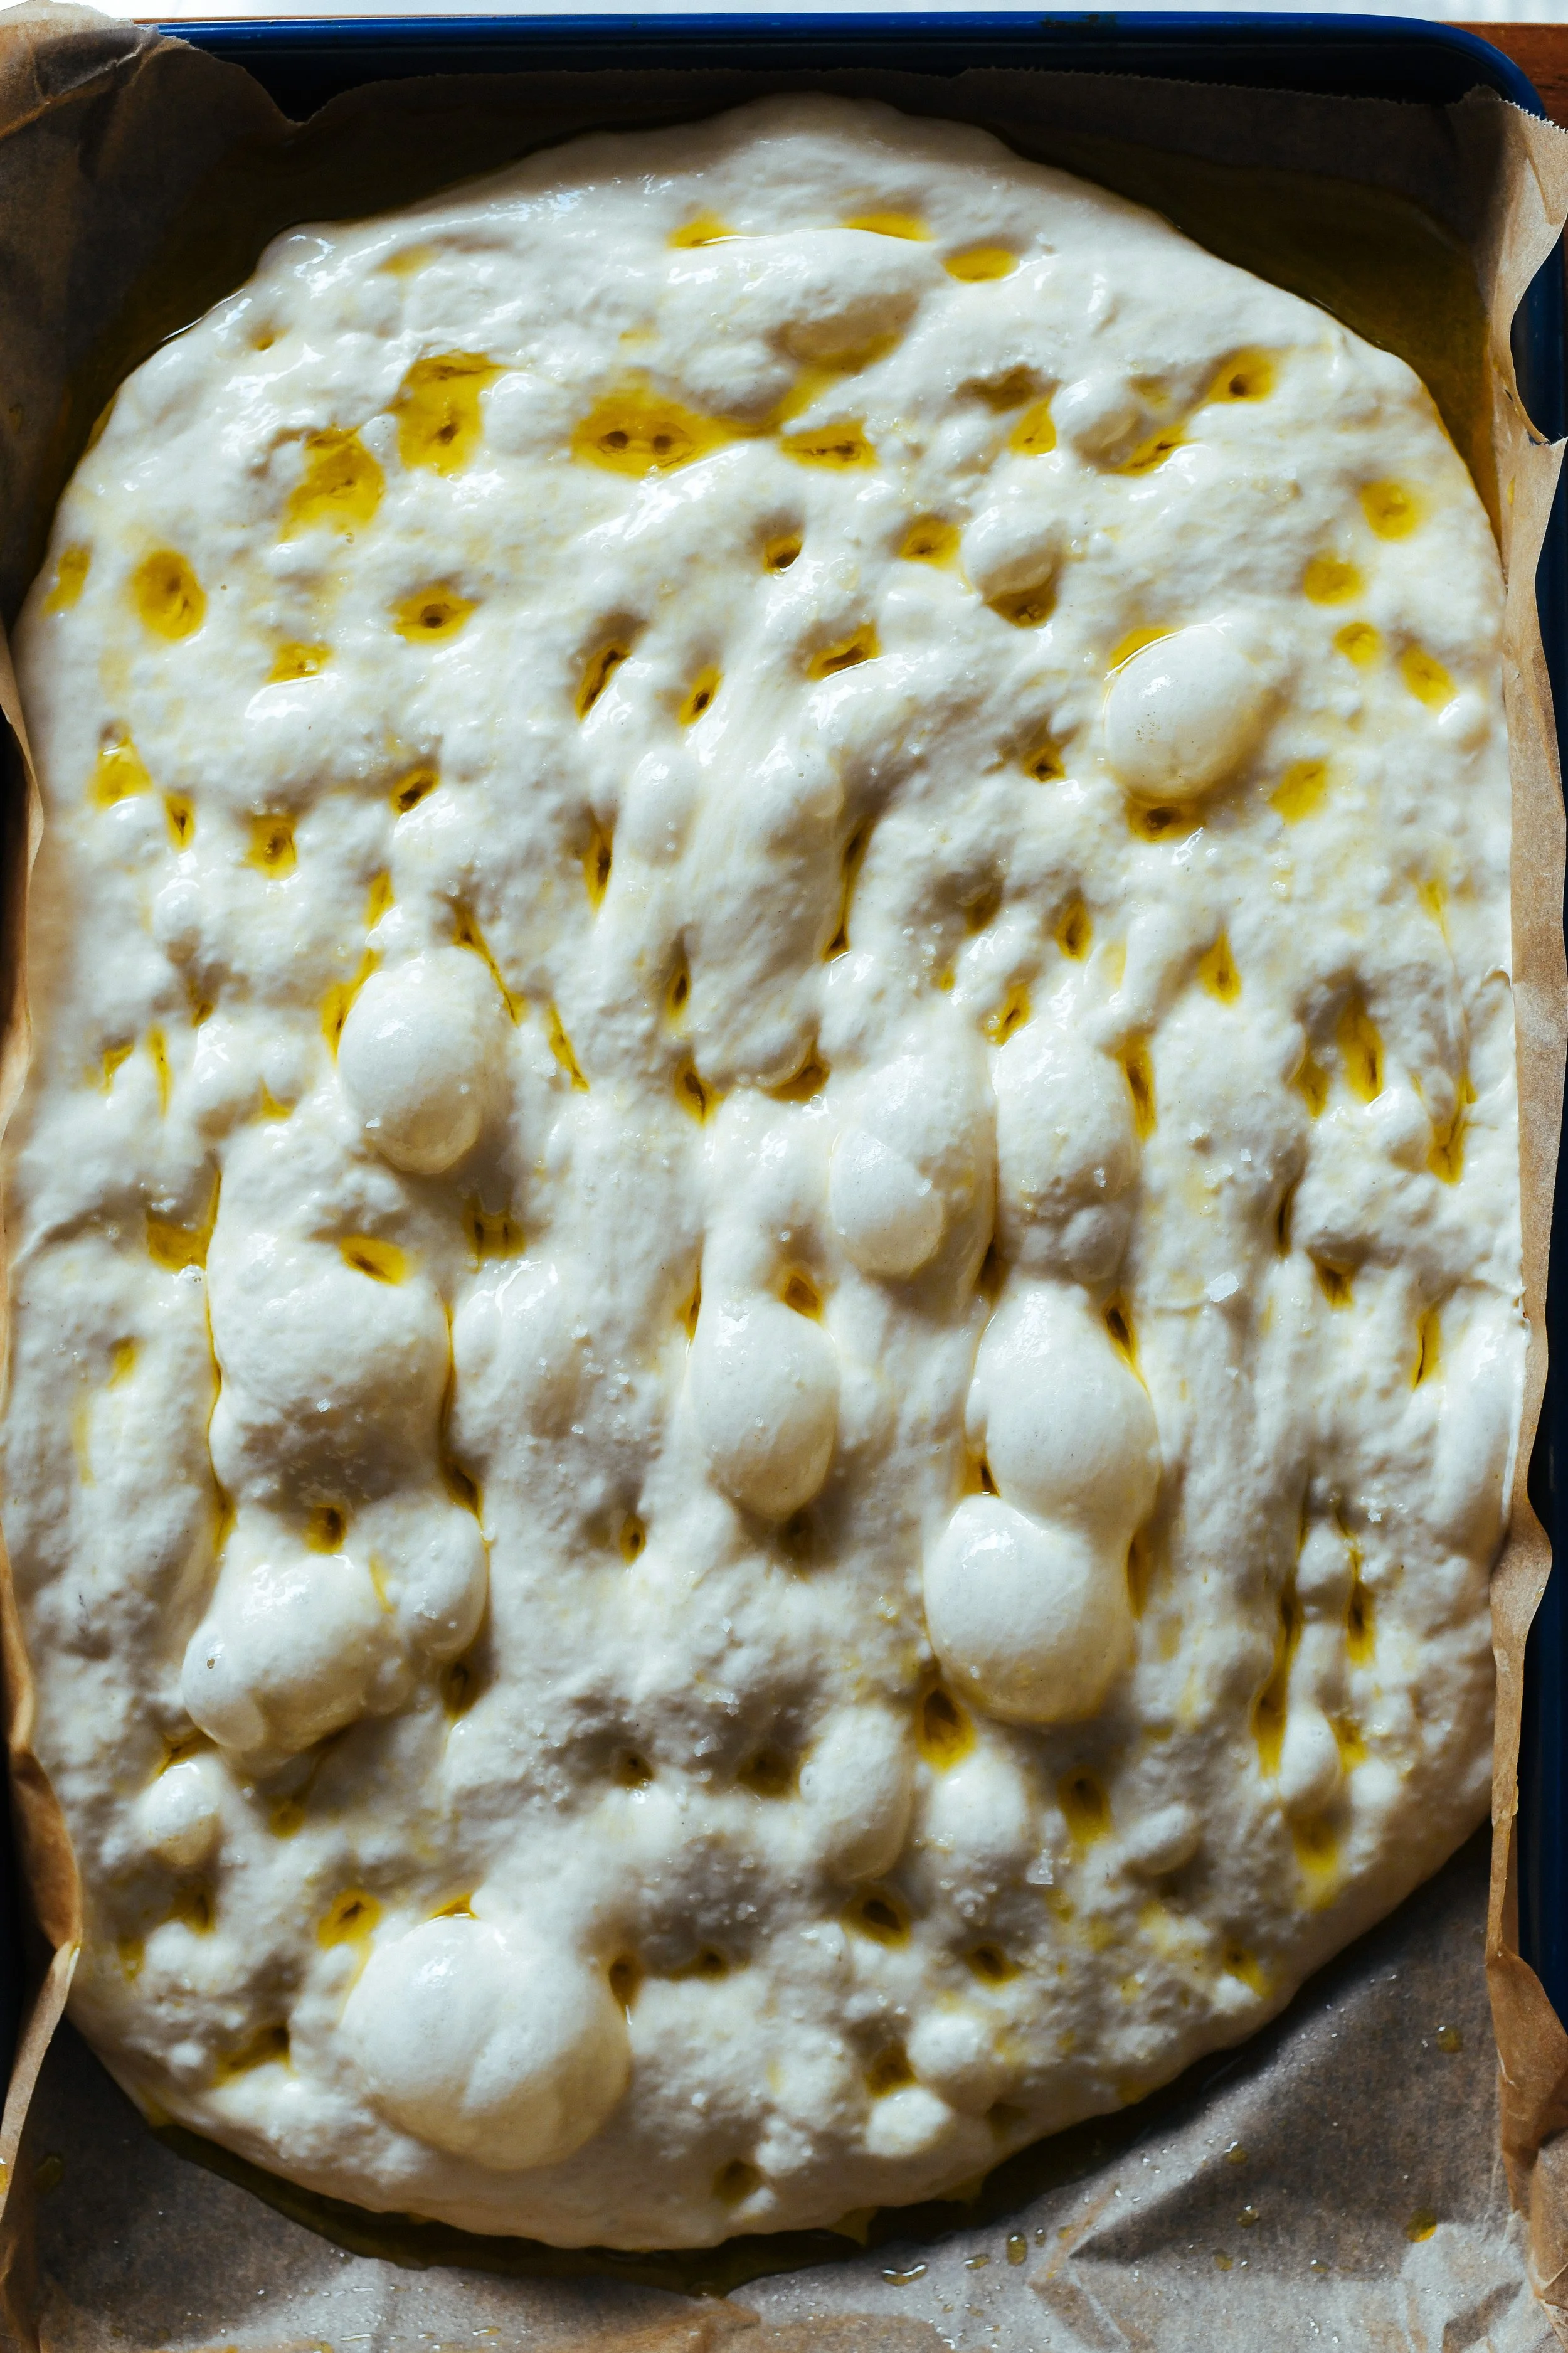
Cover and let the dough rise in a warm spot for 1 hour (or pop it in the fridge overnight for a cold ferment). When ready, grease a shallow 24x38cm baking tray with olive oil, line the base with baking paper, and add more oil on top. Gently tip the dough onto the tray, fold the edges into the centre to form a neat shape, and flip it seam-side down. Let it proof for 30-120 minutes until plump, jiggly, and spread across the tray.
6. Dimple and bake
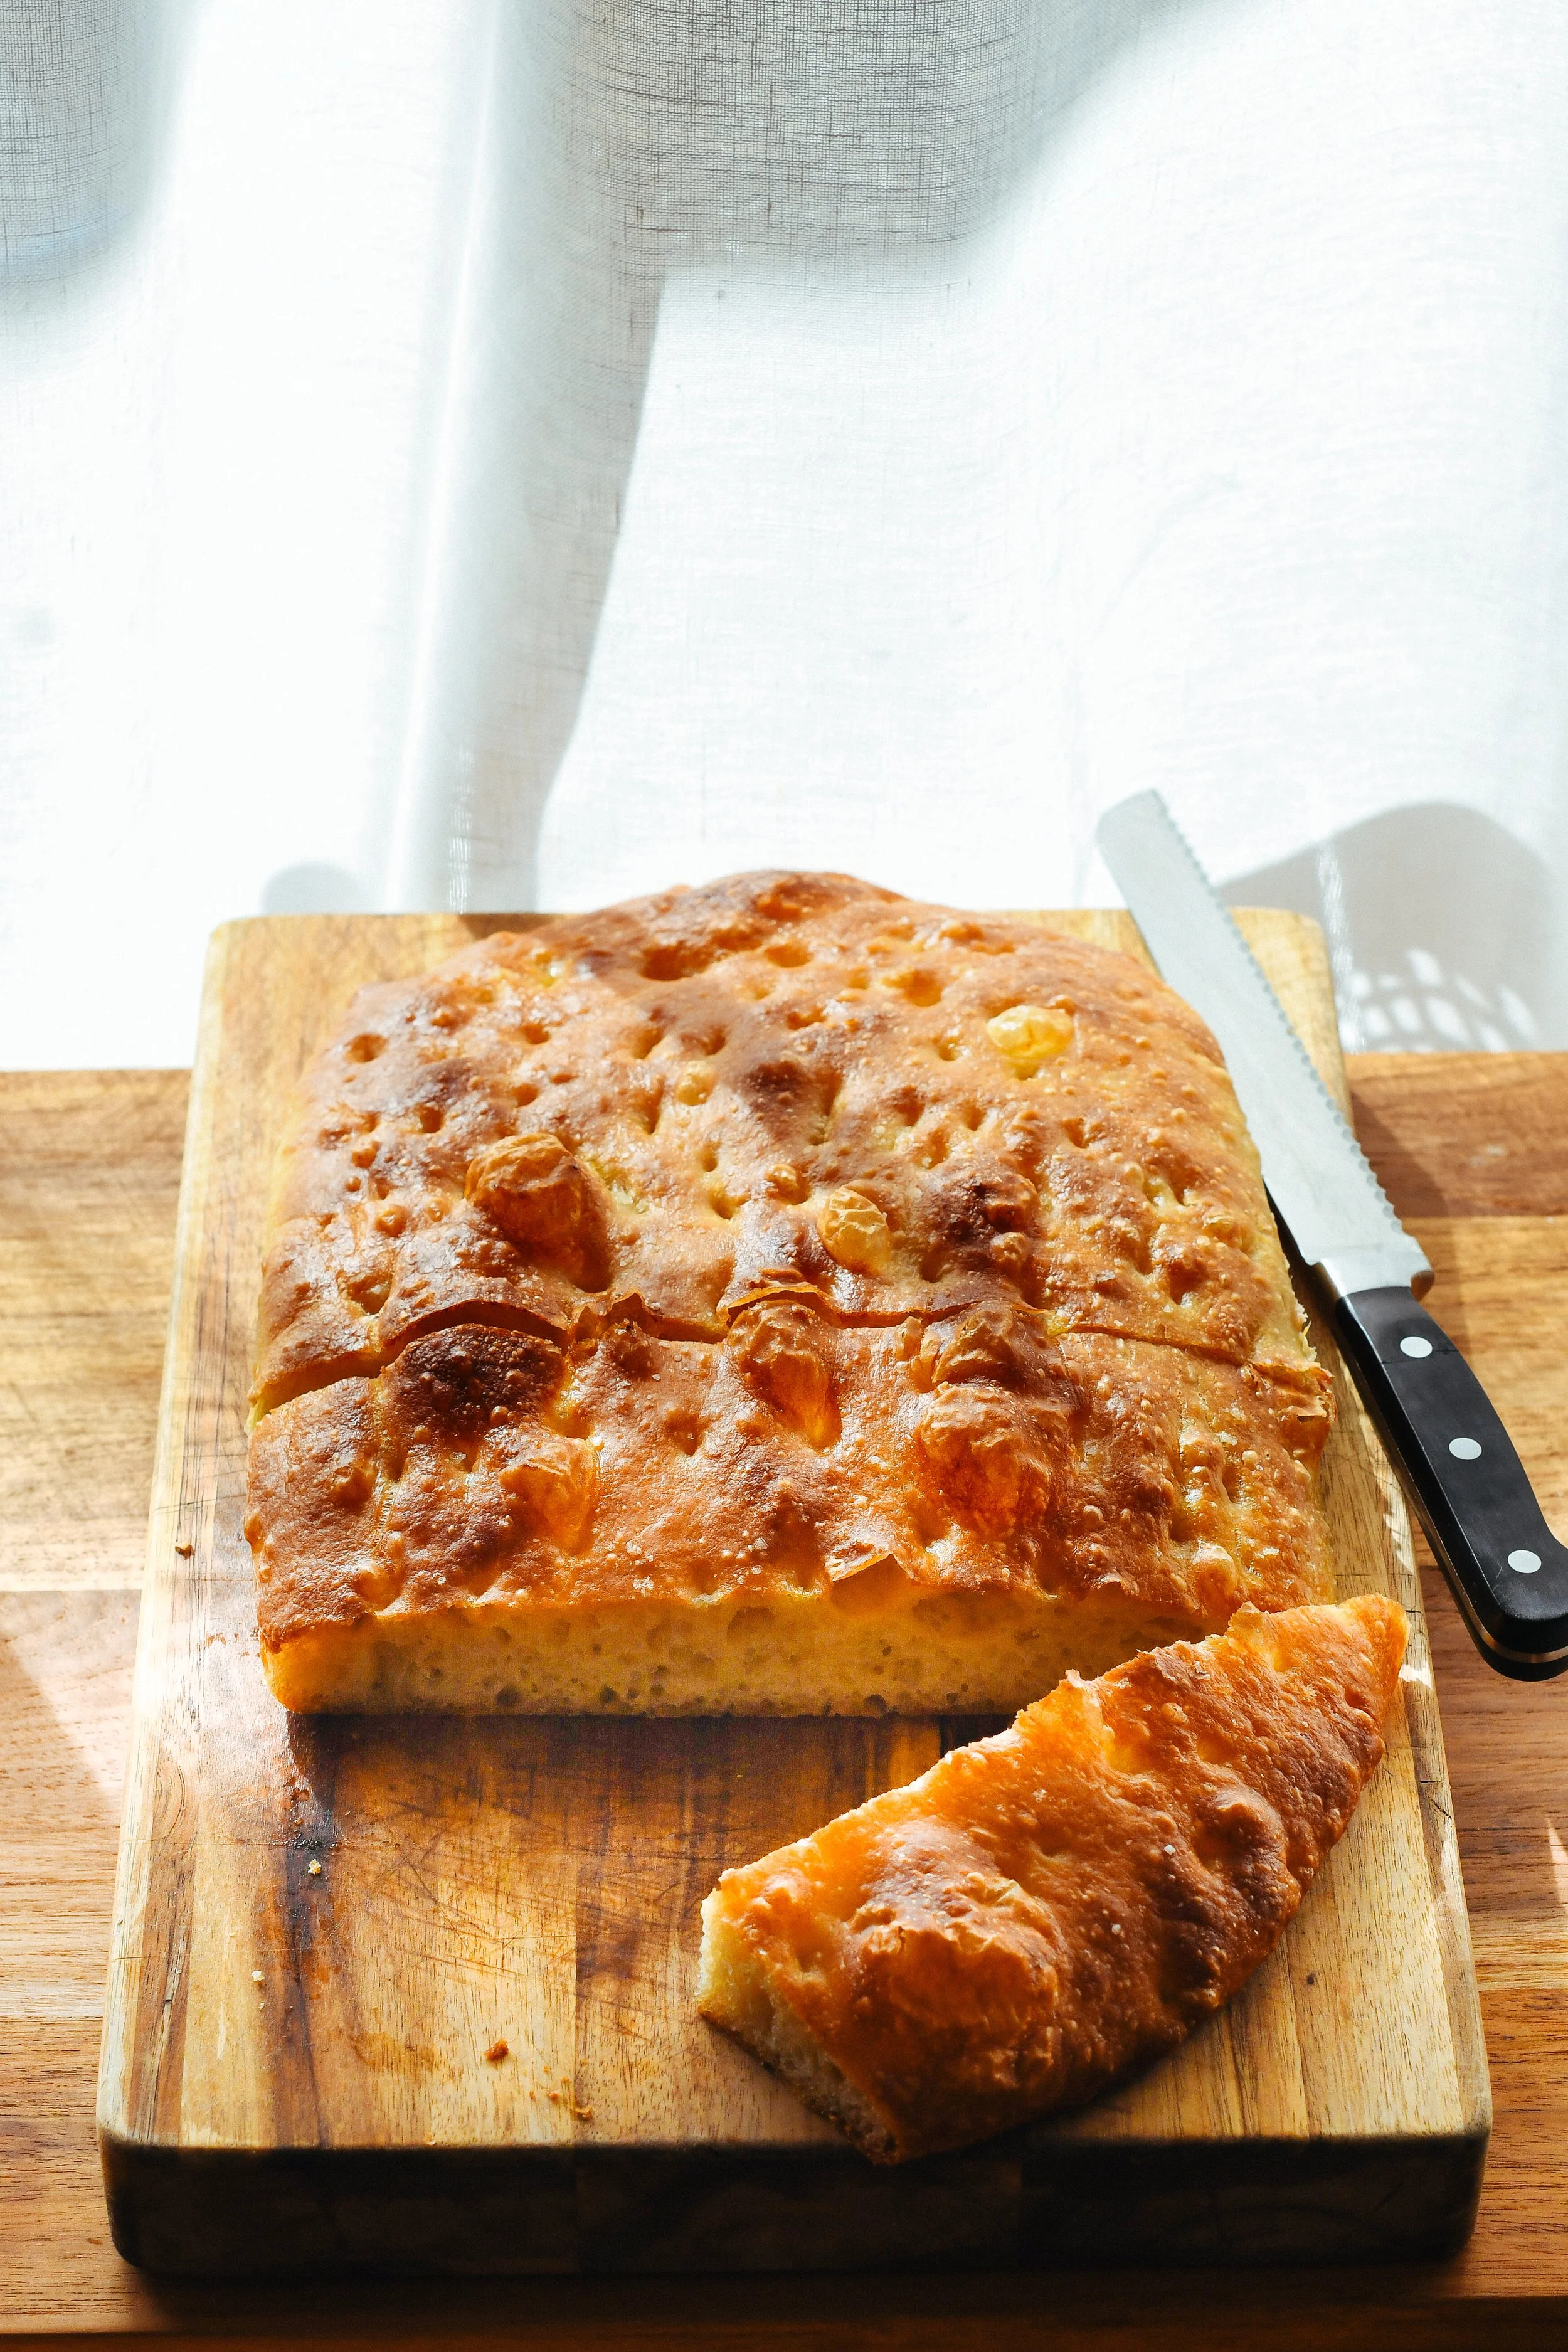
Preheat your oven to 230°C (210°C fan). Drizzle a generous 3-4 tablespoons of olive oil over the top of the dough. Oil your hands and press your fingers firmly down into the dough to create those classic deep dimples, taking care not to pop the big air bubbles. Scatter generously with sea salt flakes, place on the lower shelf, and bake for 25-30 minutes until a deep, golden crust forms. Let it cool on a wire rack for 20 minutes before slicing.
Tips and tricks for making the best focaccia
The best flour for focaccia
I have found really wonderful consistency by using Mulino Caputo’s Manitoba Oro flour – it’s a strong bread flour with a high protein content (14%). I have found this at local independent grocers, as well as some larger supermarkets. If you can find this flour, I highly recommend!
I’ve also had great success with Molino Pasini’s pizza flour (>12% protein), however I find this more difficult to source in QLD hence why I opt for Manitoba Oro.
Either way – it is important to use a strong bread flour for best results – and it’s fun to experiment with brands that you have available to you, as long as the flour you choose has a protein content between 12-14% you should be sweet.
Ideal oven temperatures
I tried a range of temps, from 210-250c and found a sweet spot bang in the middle at 230c. The balance is trying to get a crisp and golden top and bottom.
Olive oil – more is more
Olive oil. Just go for it. I mean, really go for it. The oil is what gives the crust its incredible, almost fried crunch and prevents it from sticking to the baking paper.
Folding techniques
After trying a few different types of folds and having no idea what I was doing, I decided a simple stretch and fold was perfect. It’s easy, it requires no thought, great results, done. Wet your hands with water to help get under the dough to do this.
Overnight proof
If you want even deeper flavour and bigger bubbles, leave your covered dough in the fridge overnight after your stretch-and-fold steps. Just give it a longer final proof the next day so it can warm up and puff up properly in the tray.

FAQs
Can I do an overnight proof instead of making it same day?
Yes you absolutely can. Doing an overnight proof can help massively with time management if you’re planning to make this for a specific event, and also helps further develop the flavour! Simply cover and place in the fridge overnight instead of bulk fermenting on your countertop.
What toppings would work best on this focaccia?
Honestly, the world is your oyster here! Focaccia is the perfect vessel for a number of toppings! I love things like rosemary, olives, anchovies, tomatoes, onions, sesame seeds, garlic – the list could go on and on.
How do I know if my yeast is working?
When you mix the yeast with water to activate it, you should see it foam up and get bubbly. If after 10-15 minutes you see no activity, then I’m sorry to say but your yeast is probably dead and you’ll need to start again with a new packet!
Can I use fresh yeast instead?
Yes you can. Check out a yeast conversion tool for accuracy, but typically you increase the weight of fresh yeast by 3 – so for this recipe I’d recommend trying 15g of fresh yeast.
What makes this focaccia stand out?
It completely demystifies bread baking for anyone who feels intimidated by sourdough schedules and starter maintenance. By utilising a high-hydration dough and gentle stretch-and-fold techniques, you get all the prized hallmarks of an artisan loaf—the glossy bubbles, the crackling golden crust, and the airy interior—with a fraction of the stress. It’s an exceptionally reliable recipe that turns out beautifully every single time.

Focaccia
Ingredients
- 500 g strong bread flour I use Mulino Caputo Manitoba Oro
- 350 ml water
- 5 g instant dry yeast
- 10 g honey
- 50 ml lukewarm water 115f / 46c
- 10 g non-iodised sea salt – I like to grind sea salt flakes down to a finer consistency
- 50 ml extra virgin olive oil
To finish
- Extra virgin olive oil
- Sea salt flakes
Instructions
Autolyse (60 minutes)
- Gently mix 500g flour and 350ml water until just combined.
- Cover and leave to rest for one hour.
- Yeast mixture (15 minutes)
- 15 minutes before the dough has finished resting, add the yeast, honey, and lukewarm water to a bowl.
- Whisk to combine and let it rest for 10-15 minutes.
- This mix should get foamy/bubbly on top – if it doesn’t, your yeast is probably dead/expired.
- The next steps can either be done in a stand mixer, or by hand. Both methods are below:
Mixing and kneading the dough (10-15 minutes)
- Option 1: With a stand mixer
- Combine the rested dough and yeast mixture in the bowl of a stand mixer, and with a dough hook attachment mix until just combined – around 1-2 minutes on a low speed.
- Add the salt and turn the mixer back on low, kneading for 5 minutes.
- Next, add the olive oil and again, knead on a low speed until combined and very smooth and the oil has incorporated – around 2-3 minutes.
- Option 2: By hand
- Add the yeast mixture to the rested dough and use your hands to cut the mixture in until just combined. Imagine squeezing a big squishy stress ball, clenching your fist as you do – that’s the motion I use.
- Add the salt and again, use your hands to cut this into the dough for a solid 10 minutes.
- Add the olive oil and repeat the cutting motion, mixing with your hands until the dough is smooth and the oil has incorporated.
Stretch and folds (90 minutes)
- NB: The is a high hydration dough at 90%, so it is wet, sticky and might feel a little out of control. That’s OK!
- Transfer the dough to an oiled container or bowl, cover with a damp tea towel, shower cap or clingfilm and rest for 45 minutes before performing your first stretch and fold:
- Wet your hands with water and scoop underneath one side of the dough
- Stretch that portion of the dough upwards, then fold it over towards the centre of the bowl
- Rotate the bowl 45 degrees and repeat until you’ve gone around all sides of the dough
- Cover the dough again, and let it rest for another 45 minutes.
- Repeat another set of stretch and folds.
Bulk ferment (60 minutes)
- Cover the dough again and rest for 1 hour in a warm spot.
OPTION FOR OVERNIGHT PROOF
- Instead of a bulk ferment for 60 min, instead cover the dough and place in the fridge overnight.
- Take out of the fridge the next day and move onto the final proof steps below.
Final proof (30-120 minutes)
- Note: my preference with focaccia is using a shallow baking tray – I personally like the depth of the focaccia not to be OTT. This recipe is perfect for a tray that measures 24x38cm. You can absolutely use a smaller, deeper pan if you prefer.
- Add a drizzle of olive oil to the base of your baking tray and rub evenly all over.
- Use baking paper to line the base of the tray, then add 2-3 tablespoons of olive oil on top of that – spread over evenly – this is to stop your focaccia from sticking to the tray.
- Carefully release the dough onto the tray, using wet hands fold the top edge and bottom edge to meet in the middle, rotate the dough 45 degrees so the long edges align with the long sides of the pan, and flip so the seam is now on the base of the pan.
- You can use wet hands to gently pull the corners from underneath to help coax it out to the shape of the pan, gently jiggle it and carefully encourage it into a uniform shape. Don’t worry if it’s not perfect.
- Next, allow the dough to have a final proof in the tray – anywhere between 30-60 minutes if you are making this same day, or 60-120 minutes if you did an overnight proof in the fridge depending on the temperature – until the dough has plumped up and spread out more evenly across the tray. It should be looking bubbly and jiggly at this point.
- While the dough is having its final proof, preheat the oven to 230c (210c fan forced).
Docking (5 minutes)
- Drizzle a generous amount of olive oil all over the focaccia – a good 3-4 tbsp.
- Dab a little bit of the oil on your fingers and rub all over your hands before pressing your fingers deep into the dough – continue doing this all over.
- Air bubbles will form in places – try not to pop them!
- Sprinkle with sea salt flakes.
Baking (30 minutes)
- Place on the lower shelf of your oven and bake for 25-30 minutes, until the top is deep golden in colour. You can place the tray on the top shelf for the final few minutes to help the top colour nicely if needs be.
- Remove from the oven and let sit in the baking tray for a few minutes, before transferring the focaccia out of the tray and onto a wire rack to cool.
- Try and let the focaccia cool for about 20 minutes before enjoying 🙂


I make this at least three times a month, the most delicious, easiest recipe! Get good olive oil and prep while you work from home and then have the best dinner ever.
Hi Mikaele,
I’m so happy to hear you like this recipe! Thanks for trying it 🙂
Gabriella